> ## Documentation Index
> Fetch the complete documentation index at: https://docs.verify-group.com/llms.txt
> Use this file to discover all available pages before exploring further.
# Claims Management
> A complete walkthrough of the Verify Group claims lifecycle — from creating a new claim through investigation, participant management, and audit trail review.
## Overview
The **Claims Management** module is a full end-to-end workspace for processing insurance claims. It covers every stage of the claims lifecycle:
1. **Intake** — A new claim is submitted with the loss details and policy information
2. **Validation** — The claim is reviewed to confirm it is complete and plausible
3. **Investigation** — Participants are added, verified, and interviewed; evidence is gathered
4. **Decision** — The claim is approved, rejected, or settled based on the investigation findings
5. **Audit** — A complete, immutable record of every action taken on the claim is preserved
Whether you are processing motor, medical, life, or property claims, the workflow is the same. The difference is in the specific fields, documents, and verification types used at each stage.
***
## Viewing the claims list
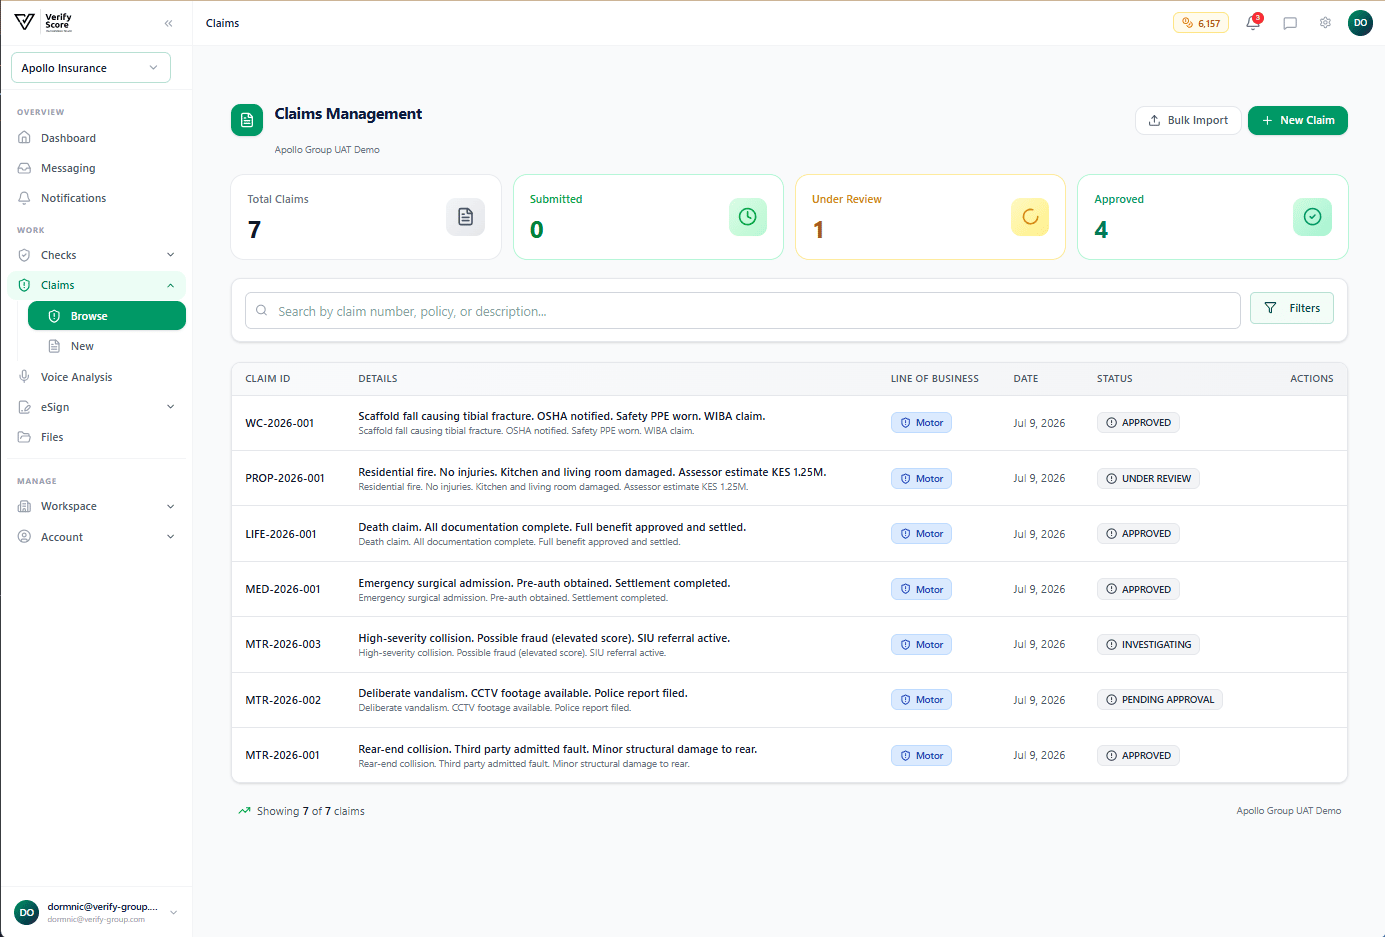 Navigate to **Claims** in the left sidebar to open the claims list. This table shows all claims in your organisation, with the most recently updated claims at the top.
Each row in the table displays:
| Column | Description |
| ----------------- | ------------------------------------------------------------------- |
| **Claim Number** | A unique reference number auto-generated when the claim was created |
| **Policy Number** | The insurance policy the claim is made against |
| **Type** | The line of business (Motor, Medical, Life, Property) |
| **Status** | The current stage in the claims workflow |
| **Amount** | The claimed amount in the organisation's currency |
| **Assigned To** | The investigator or adjuster responsible for this claim |
| **Last Updated** | When the claim record was last changed |
**Filtering the list:**
Use the search bar to search by claim number, policy number, or participant name. Use the **Status** filter to show only claims at a specific stage (e.g., all claims currently Under Investigation).
***
## Creating a new claim
Navigate to **Claims** in the left sidebar to open the claims list. This table shows all claims in your organisation, with the most recently updated claims at the top.
Each row in the table displays:
| Column | Description |
| ----------------- | ------------------------------------------------------------------- |
| **Claim Number** | A unique reference number auto-generated when the claim was created |
| **Policy Number** | The insurance policy the claim is made against |
| **Type** | The line of business (Motor, Medical, Life, Property) |
| **Status** | The current stage in the claims workflow |
| **Amount** | The claimed amount in the organisation's currency |
| **Assigned To** | The investigator or adjuster responsible for this claim |
| **Last Updated** | When the claim record was last changed |
**Filtering the list:**
Use the search bar to search by claim number, policy number, or participant name. Use the **Status** filter to show only claims at a specific stage (e.g., all claims currently Under Investigation).
***
## Creating a new claim
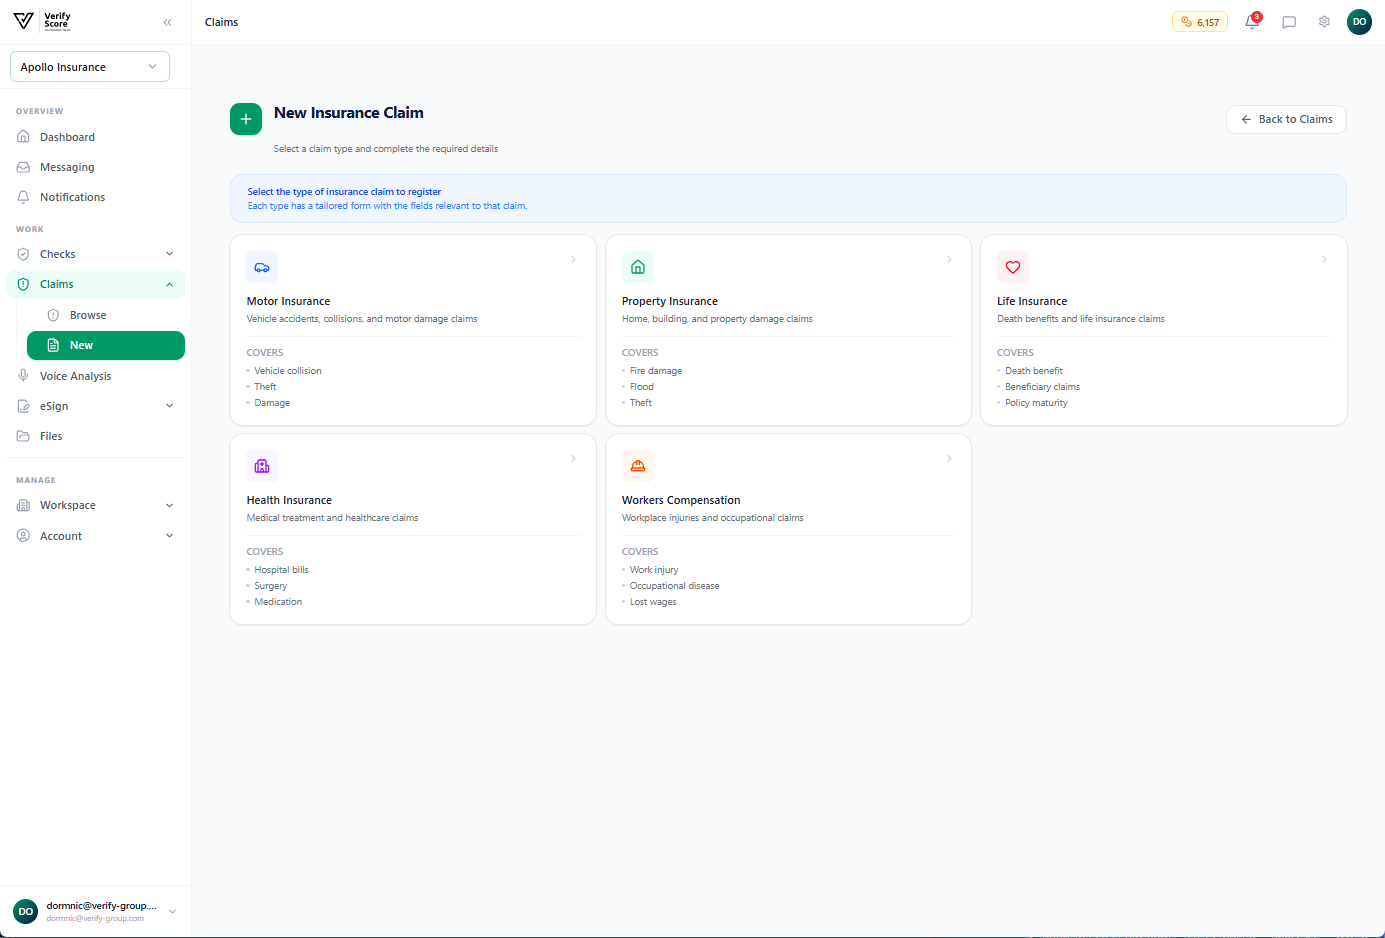 From the claims list, click the **New Claim** button in the top-right corner.
Choose the line of business from the dropdown: **Motor**, **Medical**, **Life**, or **Property**. The form fields shown will change depending on the type you select.
Fill in the **Policy Number**, **Insured Name**, and **Date of Loss**. The policy number is used to pull in the relevant policy terms and coverage limits from your connected policy management system.
In the **Incident Description** field, write a brief summary of what happened. Include as much relevant detail as possible — the location, time, circumstances, and any third parties involved.
Enter the amount the claimant is requesting in the **Claim Amount** field. This can be updated later as the investigation develops.
Click **Create Claim**. The claim is created with the status **Submitted** and assigned a claim number. You are taken directly to the claim detail page.
***
## The Motor Claim wizard
For motor insurance claims, the platform provides a structured wizard that guides you through all the required information in a logical sequence.
From the claims list, click the **New Claim** button in the top-right corner.
Choose the line of business from the dropdown: **Motor**, **Medical**, **Life**, or **Property**. The form fields shown will change depending on the type you select.
Fill in the **Policy Number**, **Insured Name**, and **Date of Loss**. The policy number is used to pull in the relevant policy terms and coverage limits from your connected policy management system.
In the **Incident Description** field, write a brief summary of what happened. Include as much relevant detail as possible — the location, time, circumstances, and any third parties involved.
Enter the amount the claimant is requesting in the **Claim Amount** field. This can be updated later as the investigation develops.
Click **Create Claim**. The claim is created with the status **Submitted** and assigned a claim number. You are taken directly to the claim detail page.
***
## The Motor Claim wizard
For motor insurance claims, the platform provides a structured wizard that guides you through all the required information in a logical sequence.
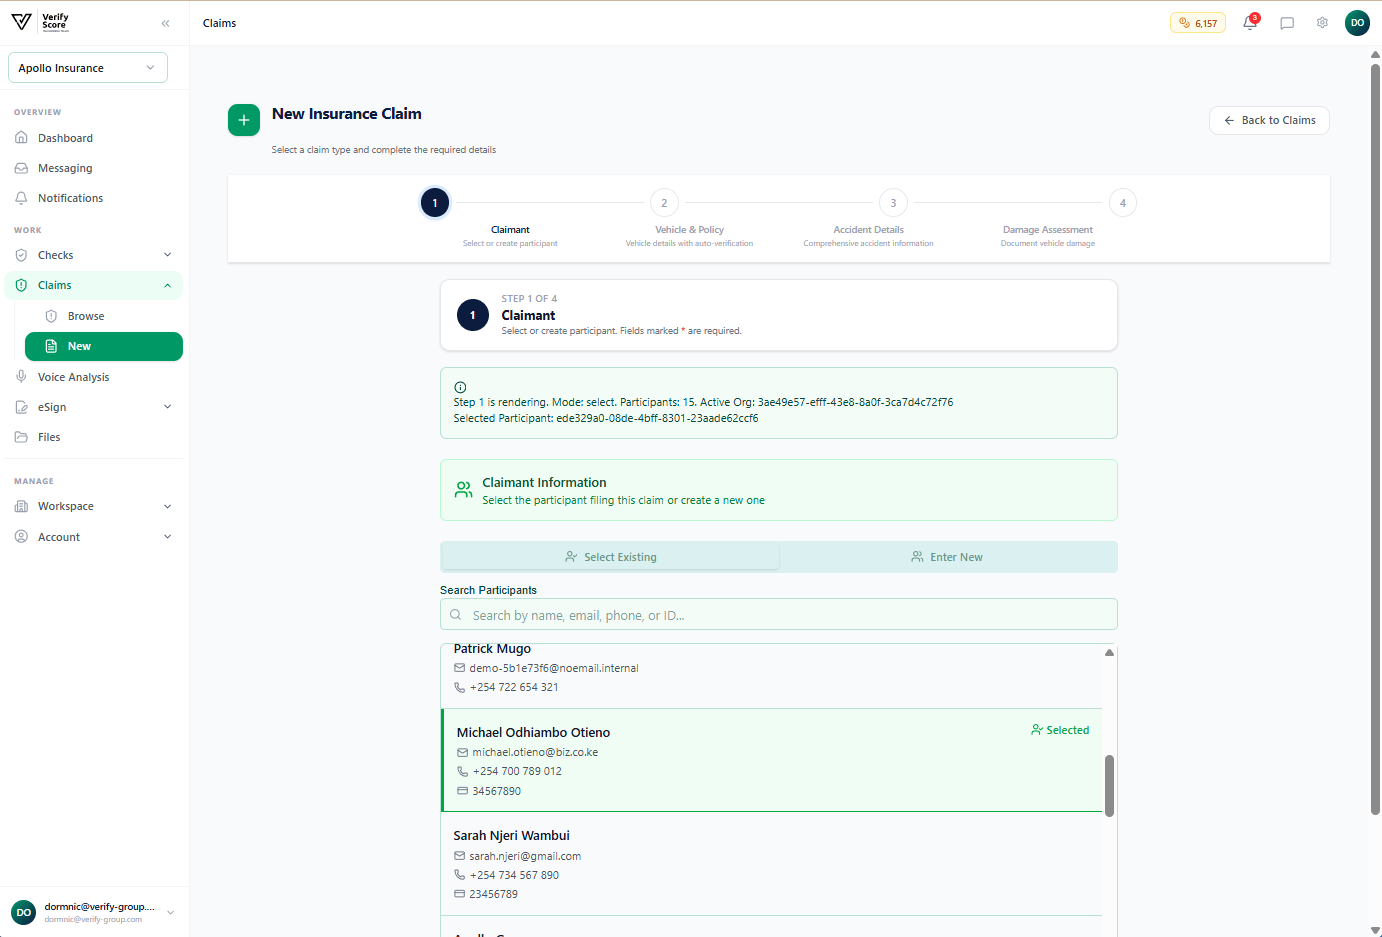 The Motor Claim wizard collects:
* **Vehicle details** — registration plate, make, model, year, and chassis number
* **Driver details** — name, licence number, and driving history
* **Accident details** — location, time, circumstances, fault assessment, and whether police were involved
* **Damage assessment** — description of damage and estimated repair cost
* **Third party details** — if another vehicle was involved, their details and insurance information
* **Witness details** — names and contact information for any witnesses
At each step, you can save your progress and return later. The wizard also prompts you to upload relevant documents (police abstract, repair estimates, photos of the damage) directly at the point where they are needed.
***
## The claim detail page
The Motor Claim wizard collects:
* **Vehicle details** — registration plate, make, model, year, and chassis number
* **Driver details** — name, licence number, and driving history
* **Accident details** — location, time, circumstances, fault assessment, and whether police were involved
* **Damage assessment** — description of damage and estimated repair cost
* **Third party details** — if another vehicle was involved, their details and insurance information
* **Witness details** — names and contact information for any witnesses
At each step, you can save your progress and return later. The wizard also prompts you to upload relevant documents (police abstract, repair estimates, photos of the damage) directly at the point where they are needed.
***
## The claim detail page
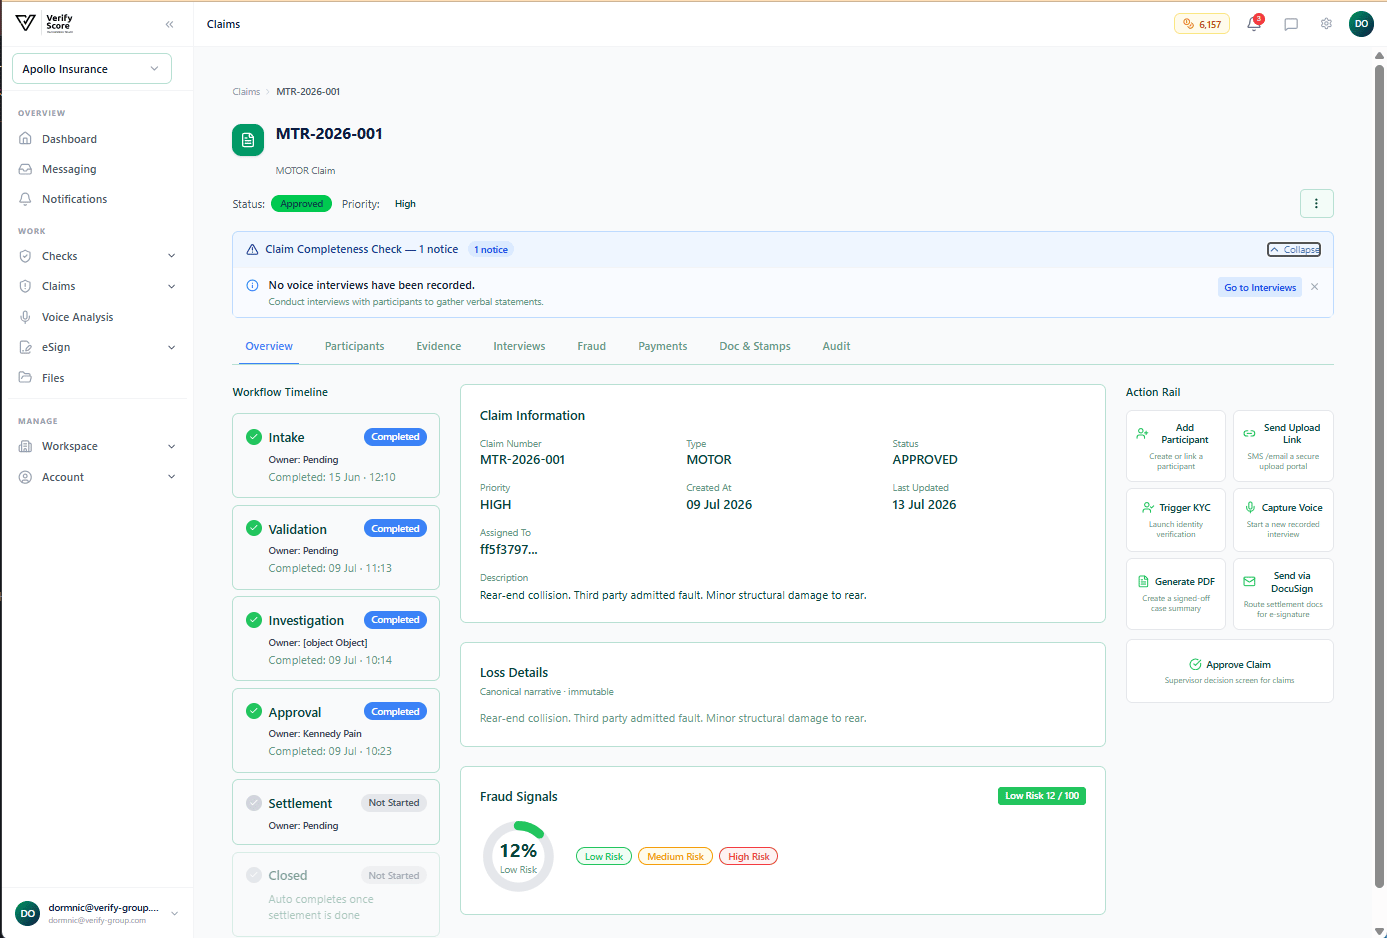 Once a claim is created, the **Claim Detail Page** becomes your central workspace for managing it from start to finish.
The page is divided into:
**Top section — Status and actions:**
* The current claim status displayed as a badge (Submitted, Under Review, Investigating, Pending Info, Approved, Rejected)
* Action buttons appropriate to the current status (e.g., **Submit for Review**, **Approve**, **Reject**, **Request Information**)
* The assigned investigator and a button to reassign
**Tab navigation:**
The main content area uses tabs to organise different aspects of the claim:
| Tab | What it contains |
| ------------------ | --------------------------------------------------------------- |
| **Overview** | Claim summary, policy details, incident description, and amount |
| **Participants** | All people linked to this claim with their roles and KYC status |
| **Documents** | Uploaded evidence, attachments, and verification reports |
| **Voice Analysis** | Recorded interviews with participants and AI fraud analysis |
| **Payments** | Settlement payment details and bank verification |
| **Audit** | Complete history of every action taken on this claim |
***
## Managing claim participants
### Viewing participants
Once a claim is created, the **Claim Detail Page** becomes your central workspace for managing it from start to finish.
The page is divided into:
**Top section — Status and actions:**
* The current claim status displayed as a badge (Submitted, Under Review, Investigating, Pending Info, Approved, Rejected)
* Action buttons appropriate to the current status (e.g., **Submit for Review**, **Approve**, **Reject**, **Request Information**)
* The assigned investigator and a button to reassign
**Tab navigation:**
The main content area uses tabs to organise different aspects of the claim:
| Tab | What it contains |
| ------------------ | --------------------------------------------------------------- |
| **Overview** | Claim summary, policy details, incident description, and amount |
| **Participants** | All people linked to this claim with their roles and KYC status |
| **Documents** | Uploaded evidence, attachments, and verification reports |
| **Voice Analysis** | Recorded interviews with participants and AI fraud analysis |
| **Payments** | Settlement payment details and bank verification |
| **Audit** | Complete history of every action taken on this claim |
***
## Managing claim participants
### Viewing participants
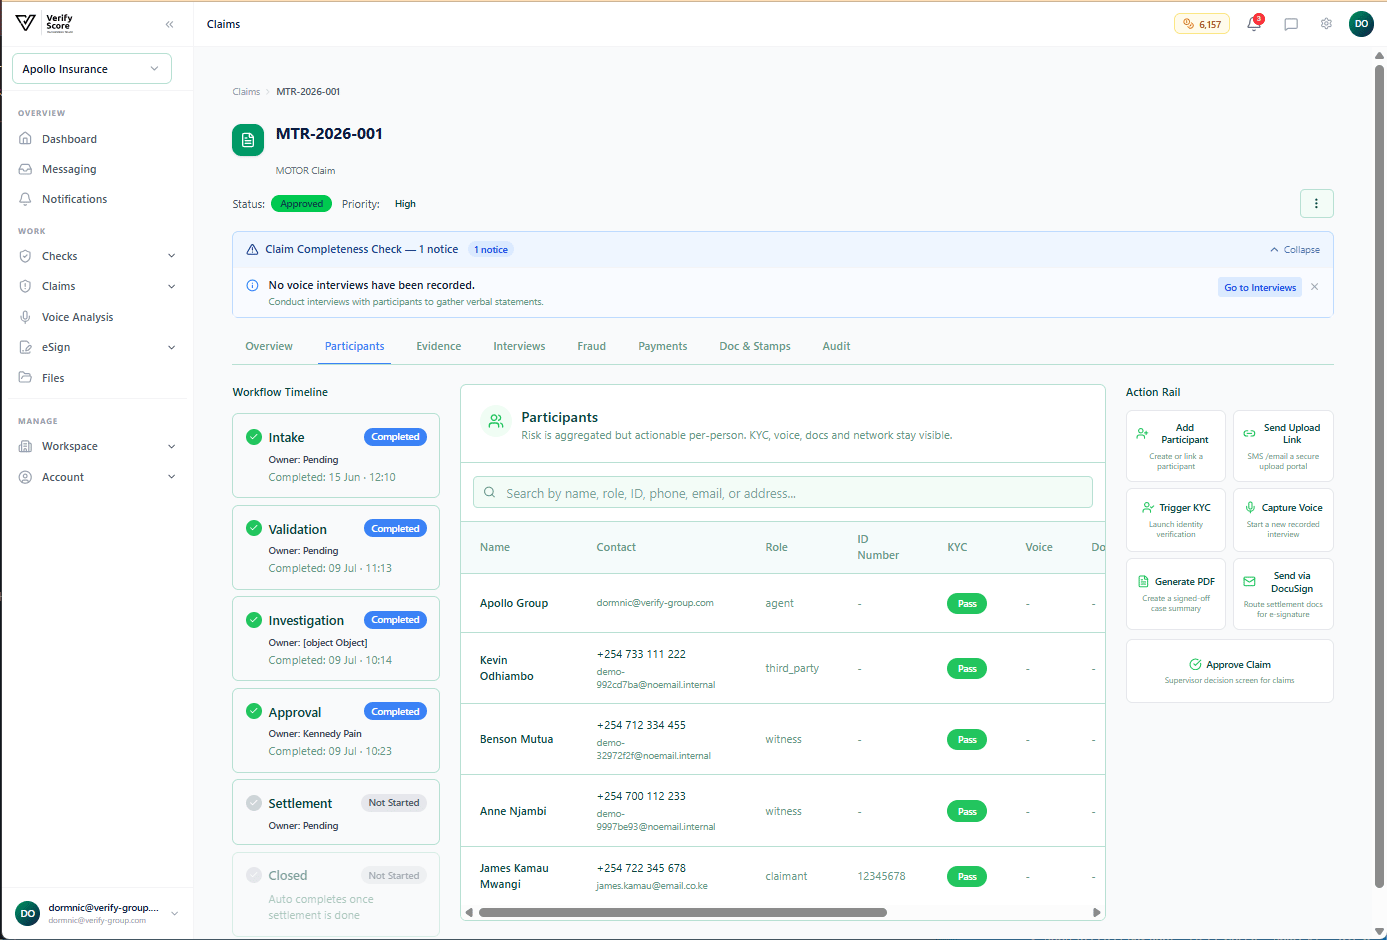 The **Participants** tab shows everyone connected to this claim. Each participant is listed with:
* Their **full name** and **role** in the claim (Claimant, Witness, Third Party, Repairer, Medical Provider)
* Their **KYC status** — whether their identity has been verified and when
* Their **contact details** (phone and email)
* Quick-action buttons to **Run KYC**, **View Profile**, or **Remove** them from the claim
### Adding a participant
The **Participants** tab shows everyone connected to this claim. Each participant is listed with:
* Their **full name** and **role** in the claim (Claimant, Witness, Third Party, Repairer, Medical Provider)
* Their **KYC status** — whether their identity has been verified and when
* Their **contact details** (phone and email)
* Quick-action buttons to **Run KYC**, **View Profile**, or **Remove** them from the claim
### Adding a participant
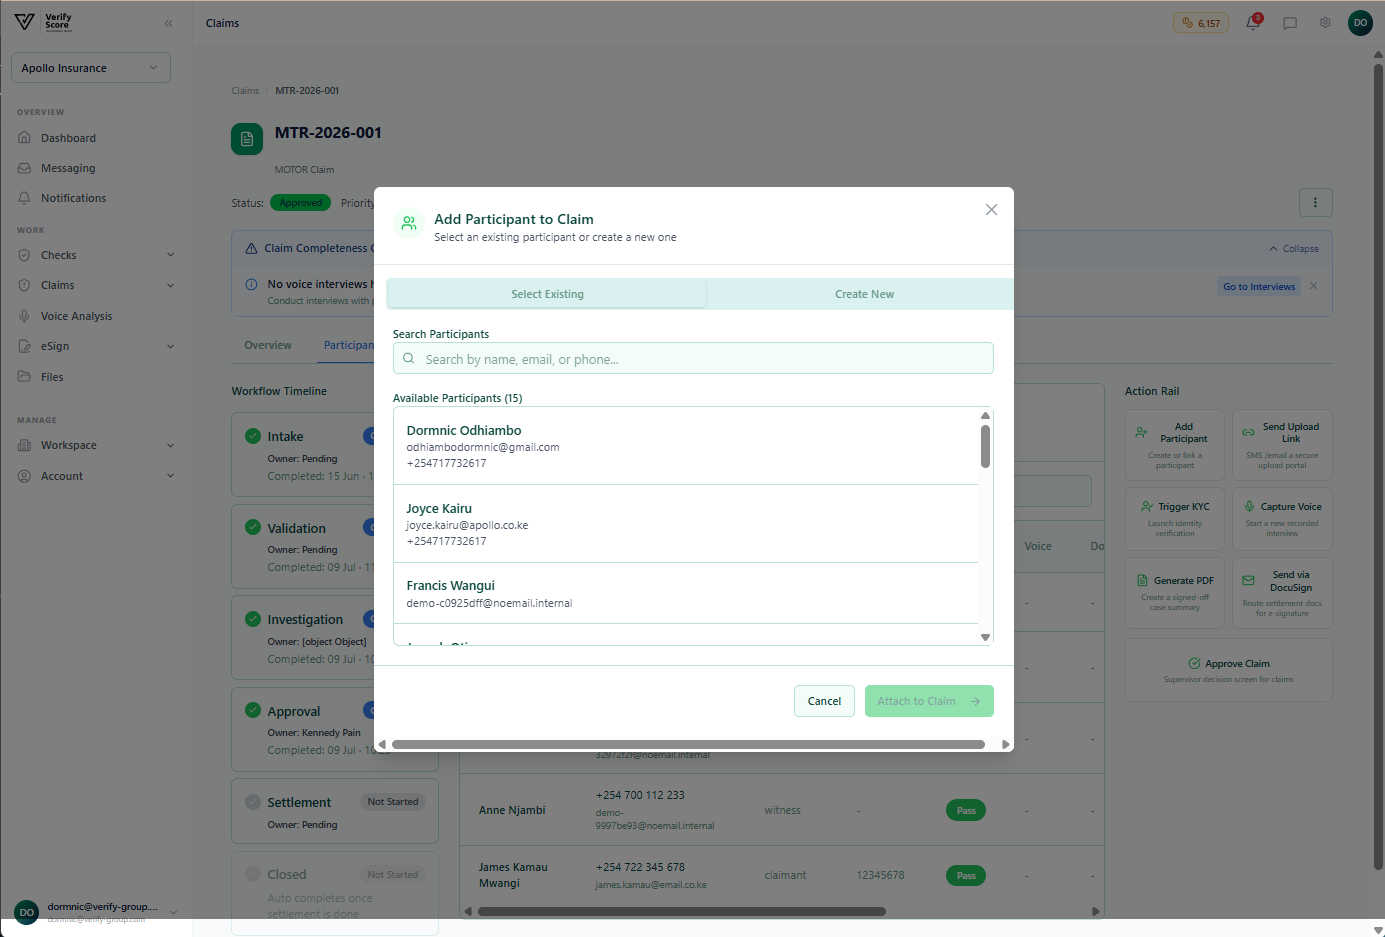 On the Participants tab, click the **Add Participant** button in the top-right corner of the participants panel.
Type the participant's name, email address, or national ID number in the search box. If they have been registered in your organisation's participant database before, their record will appear in the dropdown — click it to select them.
If the participant does not appear in the search results, click **Create New Participant**. Fill in their full name, email, phone number, and ID number. This creates a new participant record in your database and links it to the claim simultaneously.
From the **Role** dropdown, select the participant's relationship to this claim. Common roles include:
* **Claimant** — the person making the claim
* **Witness** — someone who witnessed the incident
* **Third Party** — another person involved (e.g., the driver of the other vehicle in a motor claim)
* **Repairer** — the garage or service provider estimating or performing repairs
Click **Add to Claim**. The participant is linked to the claim and you are given the option to run a KYC check on them immediately. Click **Run KYC** to begin verification or **Skip** to add them without verifying yet.
### The POI Profile modal
On the Participants tab, click the **Add Participant** button in the top-right corner of the participants panel.
Type the participant's name, email address, or national ID number in the search box. If they have been registered in your organisation's participant database before, their record will appear in the dropdown — click it to select them.
If the participant does not appear in the search results, click **Create New Participant**. Fill in their full name, email, phone number, and ID number. This creates a new participant record in your database and links it to the claim simultaneously.
From the **Role** dropdown, select the participant's relationship to this claim. Common roles include:
* **Claimant** — the person making the claim
* **Witness** — someone who witnessed the incident
* **Third Party** — another person involved (e.g., the driver of the other vehicle in a motor claim)
* **Repairer** — the garage or service provider estimating or performing repairs
Click **Add to Claim**. The participant is linked to the claim and you are given the option to run a KYC check on them immediately. Click **Run KYC** to begin verification or **Skip** to add them without verifying yet.
### The POI Profile modal
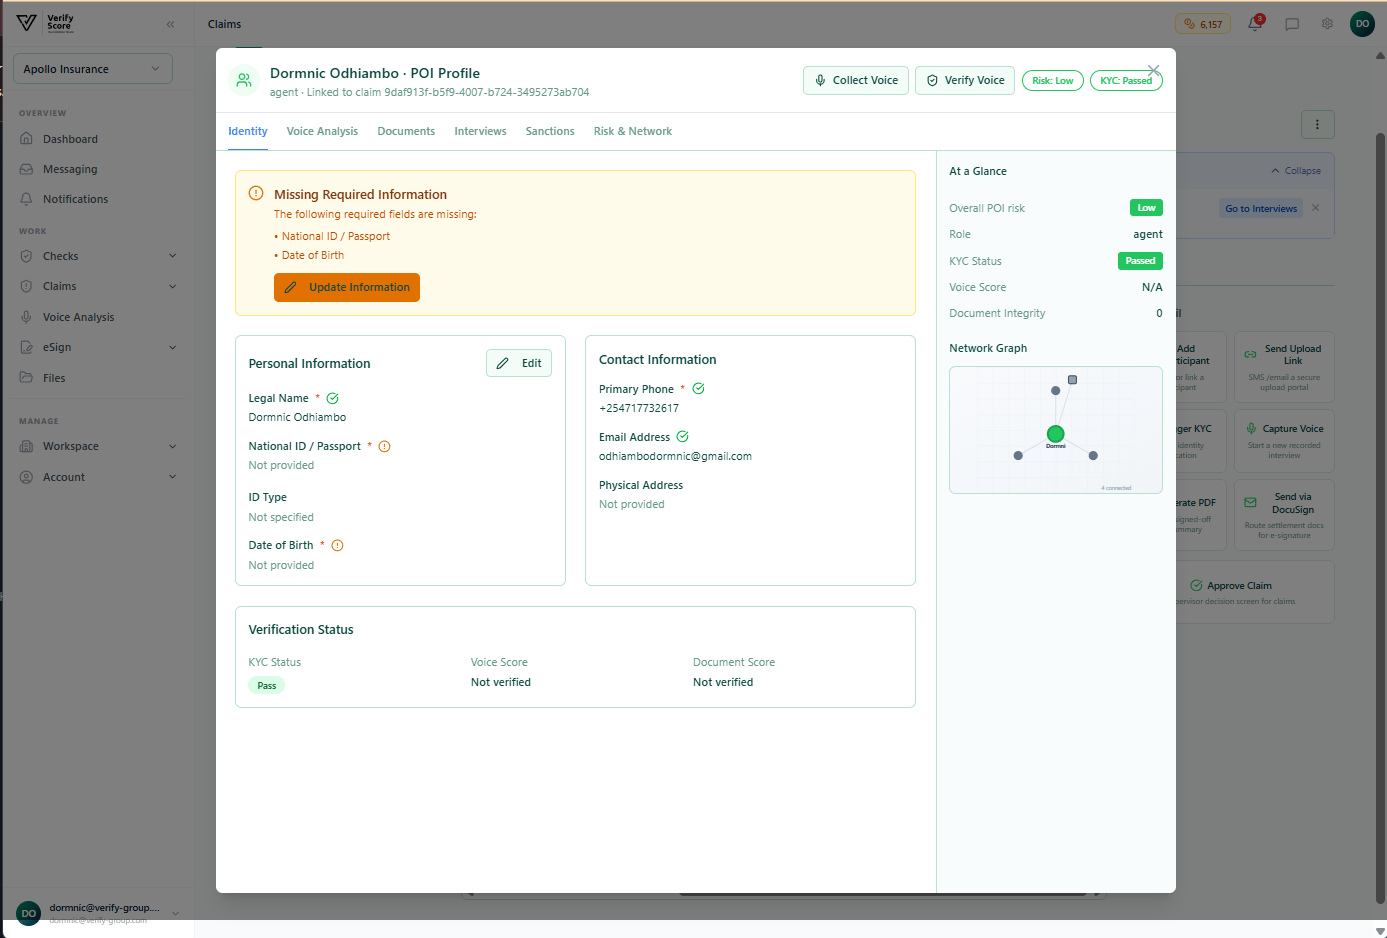 Clicking **View Profile** on any participant opens the **Participant Profile** modal — a deep-dive view of everything the platform knows about this person in the context of this claim.
The modal is organised into tabs:
| Tab | What it shows |
| ------------------ | ----------------------------------------------------------------------- |
| **Identity** | KYC verification status, ID details, and biometric match results |
| **Voice Analysis** | Recorded interviews, prosodic analysis scores, and deception indicators |
| **Documents** | Documents uploaded for this participant |
| **Interviews** | Voice interview sessions linked to this participant |
| **Sanctions** | Watchlist screening results |
| **Risk & Network** | Network graph showing connections to other claims and participants |
The **Risk & Network** tab is particularly powerful — it shows a visual graph of how this participant connects to other claims, other participants, and known risk indicators. A participant who appears in multiple unrelated claims at the same time, or who shares identifiers (phone number, bank account) with other high-risk participants, is flagged with a warning indicator.
***
## The audit trail
Clicking **View Profile** on any participant opens the **Participant Profile** modal — a deep-dive view of everything the platform knows about this person in the context of this claim.
The modal is organised into tabs:
| Tab | What it shows |
| ------------------ | ----------------------------------------------------------------------- |
| **Identity** | KYC verification status, ID details, and biometric match results |
| **Voice Analysis** | Recorded interviews, prosodic analysis scores, and deception indicators |
| **Documents** | Documents uploaded for this participant |
| **Interviews** | Voice interview sessions linked to this participant |
| **Sanctions** | Watchlist screening results |
| **Risk & Network** | Network graph showing connections to other claims and participants |
The **Risk & Network** tab is particularly powerful — it shows a visual graph of how this participant connects to other claims, other participants, and known risk indicators. A participant who appears in multiple unrelated claims at the same time, or who shares identifiers (phone number, bank account) with other high-risk participants, is flagged with a warning indicator.
***
## The audit trail
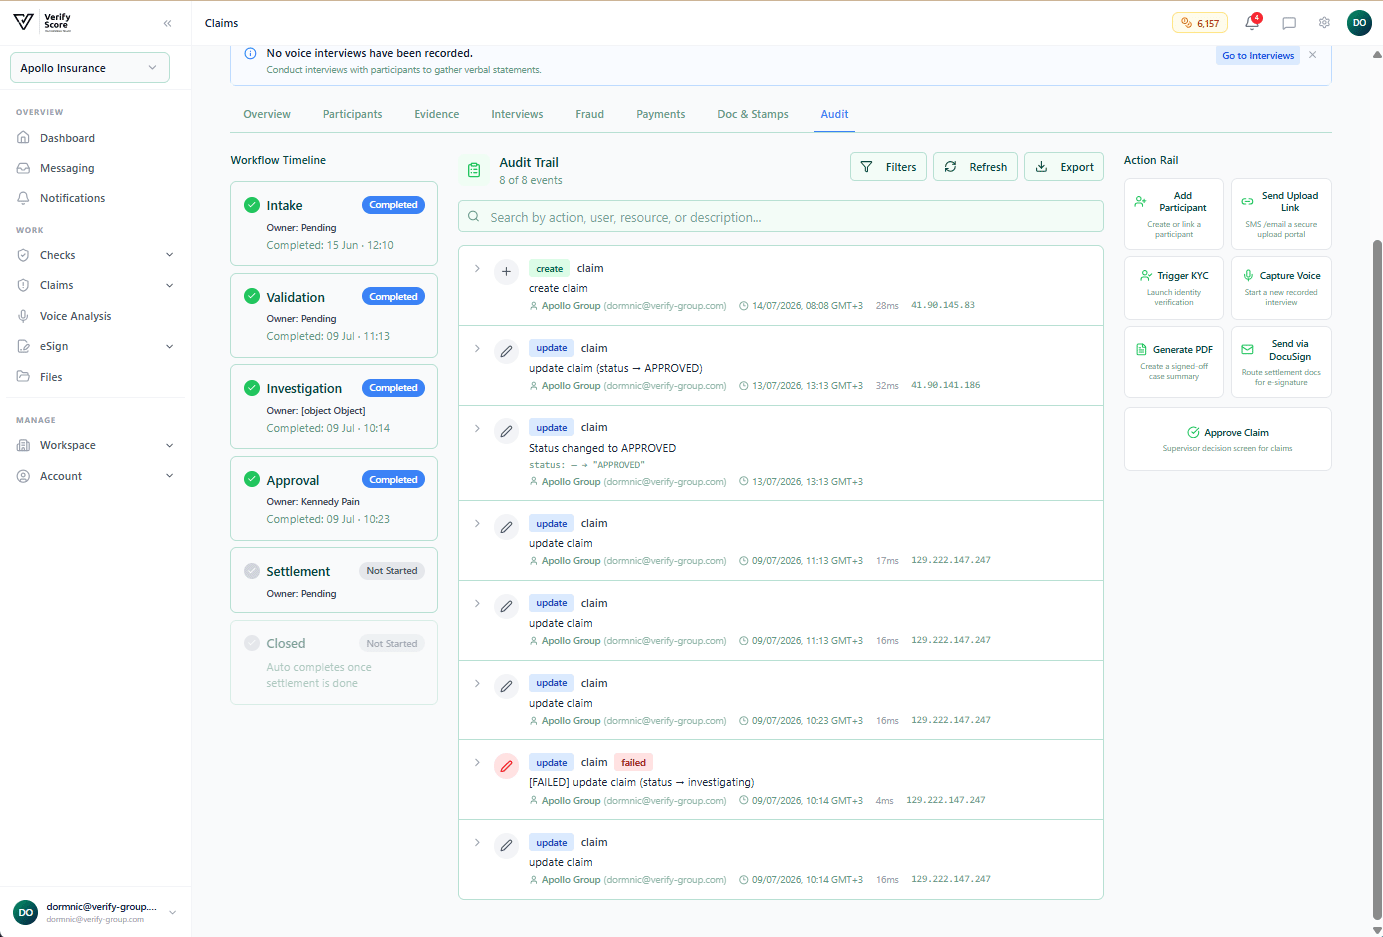 Every action taken on a claim — by any user, at any time — is recorded in the **Audit** tab. This creates an immutable, timestamped record that is essential for regulatory compliance, fraud investigations, and dispute resolution.
Each audit entry shows:
| Field | Description |
| ------------- | -------------------------------------------------------------- |
| **Timestamp** | The exact date and time the action was performed (in UTC) |
| **User** | The name and email of the team member who performed the action |
| **Action** | A plain-language description of what was done |
| **Before** | The state of the relevant field before the change |
| **After** | The state of the relevant field after the change |
**Examples of actions logged:**
* "Status changed from Submitted to Under Review by Jane Smith"
* "Participant added: John Doe (Claimant) by Mark Johnson"
* "KYC verification run on John Doe by Sarah White — Result: Verified"
* "Document uploaded: Police Abstract — by Mark Johnson"
* "Claim Amount updated from KSh 180,000 to KSh 200,000 by Jane Smith"
You can **export the audit trail** as a CSV by clicking the **Export** button in the top-right of the Audit tab. This is useful when preparing evidence for legal proceedings or regulatory inspections.
***
## Claim statuses explained
| Status | What it means |
| ----------------- | --------------------------------------------------------------------------------------- |
| **Submitted** | The claim has been received and is awaiting review |
| **Under Review** | A team member has started reviewing the claim for completeness |
| **Investigating** | Active investigation is underway — evidence is being gathered and participants verified |
| **Pending Info** | The claim is waiting for additional information from the claimant or a third party |
| **Approved** | The claim has been approved for settlement |
| **Rejected** | The claim has been declined — the reason is recorded in the audit trail |
| **Settled** | The approved payment has been made and the claim is closed |
***
## Next steps
Discuss claim details with your team through the built-in messaging system.
Run KYC on claim participants to confirm their identities.
Every action taken on a claim — by any user, at any time — is recorded in the **Audit** tab. This creates an immutable, timestamped record that is essential for regulatory compliance, fraud investigations, and dispute resolution.
Each audit entry shows:
| Field | Description |
| ------------- | -------------------------------------------------------------- |
| **Timestamp** | The exact date and time the action was performed (in UTC) |
| **User** | The name and email of the team member who performed the action |
| **Action** | A plain-language description of what was done |
| **Before** | The state of the relevant field before the change |
| **After** | The state of the relevant field after the change |
**Examples of actions logged:**
* "Status changed from Submitted to Under Review by Jane Smith"
* "Participant added: John Doe (Claimant) by Mark Johnson"
* "KYC verification run on John Doe by Sarah White — Result: Verified"
* "Document uploaded: Police Abstract — by Mark Johnson"
* "Claim Amount updated from KSh 180,000 to KSh 200,000 by Jane Smith"
You can **export the audit trail** as a CSV by clicking the **Export** button in the top-right of the Audit tab. This is useful when preparing evidence for legal proceedings or regulatory inspections.
***
## Claim statuses explained
| Status | What it means |
| ----------------- | --------------------------------------------------------------------------------------- |
| **Submitted** | The claim has been received and is awaiting review |
| **Under Review** | A team member has started reviewing the claim for completeness |
| **Investigating** | Active investigation is underway — evidence is being gathered and participants verified |
| **Pending Info** | The claim is waiting for additional information from the claimant or a third party |
| **Approved** | The claim has been approved for settlement |
| **Rejected** | The claim has been declined — the reason is recorded in the audit trail |
| **Settled** | The approved payment has been made and the claim is closed |
***
## Next steps
Discuss claim details with your team through the built-in messaging system.
Run KYC on claim participants to confirm their identities.