> ## Documentation Index
> Fetch the complete documentation index at: https://docs.verify-group.com/llms.txt
> Use this file to discover all available pages before exploring further.
# Custom Checks
> Design and run tailored verification scenarios for your organisation's specific compliance needs — beyond the standard KYC and document flows.
## Overview
Every organisation has unique compliance requirements that go beyond what standard KYC flows cover. Verify Group's **Custom Checks** feature lets you create bespoke verification scenarios by combining different data sources, check types, and decision criteria into a single named workflow that your team can run repeatedly.
**Common use cases for Custom Checks:**
* Verifying a specific combination of documents required by your regulator
* Running a multi-layered check on high-net-worth individuals that standard KYC does not cover
* Creating an industry-specific onboarding flow (e.g., for healthcare providers, licensed brokers, or government contractors)
* Screening a participant against a private internal watchlist in addition to standard sanctions lists
***
## The Custom Checks screen
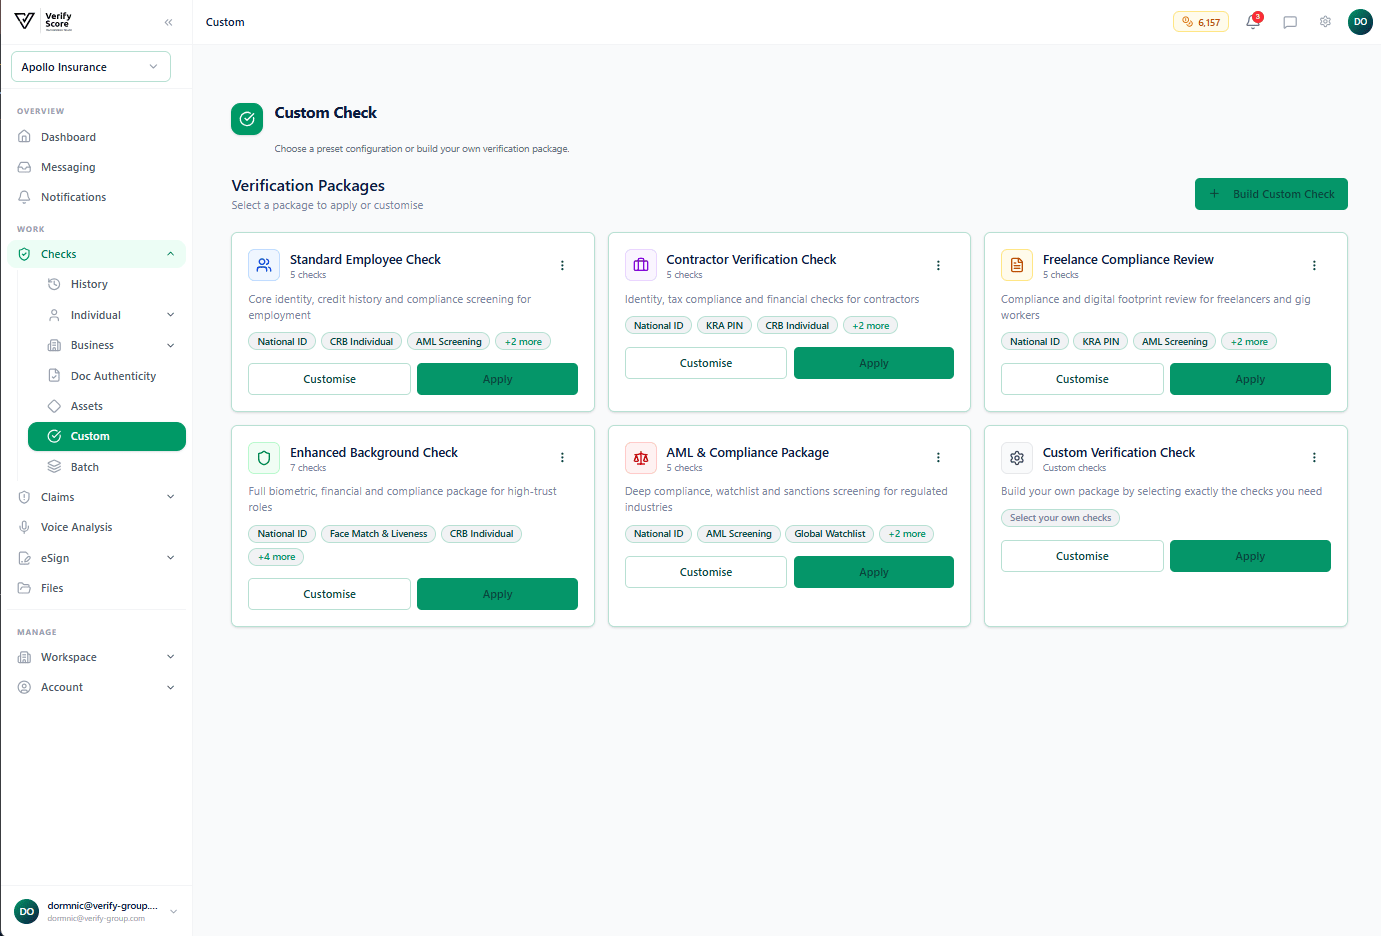 Navigate to **Checks → Custom** in the left sidebar to open the Custom Checks workspace.
The screen is divided into two areas:
**Left panel — Available checks:**
A catalogue of all individual check components you can include in your custom flow. These include:
* Identity checks (national ID, passport, alien ID)
* Biometric checks (face match, liveness)
* Contact checks (phone OTP, email verification)
* Sanctions screening (select which watchlists to include)
* Document authenticity (choose document types)
* Asset verification (vehicle, property)
* Digital footprint (OSINT analysis)
* Financial checks (credit score, employment)
**Right panel — Your workflow builder:**
Drag check components from the left panel into the right panel to build your flow. Components are executed in the order they appear — from top to bottom. You can drag to reorder them.
***
## Creating a Custom Check
Click the **New Custom Check** button in the top-right corner of the screen. A dialog box appears asking you to name your check.
Give your check a descriptive name that your team will recognise — for example, "Broker Onboarding — Full", "High-Value Claimant Screen", or "Supplier Due Diligence". Click **Create**.
Drag the check types you want from the left panel into the workflow area on the right. Each component can be configured individually — click the **gear icon** on any component to open its settings, where you can specify:
* Which data source to use
* What the minimum score threshold should be for a "pass"
* Whether this component is required or optional
* What action to take on a failure (stop the flow, flag for review, continue anyway)
At the bottom of the workflow builder, configure the **Overall Decision Logic**:
* **All must pass** — the participant only receives a "Verified" outcome if every single component passes
* **Weighted scoring** — each component is assigned a weight; the participant passes if the weighted total score exceeds your threshold
* **Custom logic** — define your own pass/fail rules using the rule editor (requires the Advanced plan)
Click **Save** to save your configuration as a draft. Click **Publish** to make the check available to the rest of your team. Once published, the check appears in the Custom Checks dropdown when your team members run a verification.
***
## Running a Custom Check
Once a Custom Check has been published, any team member with the **Investigator** or **Admin** role can run it:
Go to **Checks → Custom** and use the **Search Participant** field to find the person or business you want to verify. You can search by name, email, ID number, or participant ID.
From the **Check Type** dropdown, select the custom check you want to run. The dropdown shows all published checks your organisation has created.
If the participant has been verified before, any previously collected data (name, ID number, date of birth, etc.) is pre-filled automatically. Review it for accuracy before proceeding.
Click **Run Check**. The platform executes each component of your custom flow in sequence. A progress bar shows which component is currently running. The full check typically completes in under 2 minutes depending on the number of components.
Once complete, the result screen shows each component's individual outcome alongside the overall decision. You can expand any component to see the raw data returned by the data provider.
***
## Managing Custom Checks
Your organisation's Custom Checks are managed from the **Custom Checks library** accessible through **Workspace → Custom Checks** (Admin role required).
From the library you can:
* **Edit** an existing check — update components, thresholds, or decision rules
* **Duplicate** a check — create a new check based on an existing one as a starting point
* **Deactivate** a check — hide it from the run dropdown without deleting it (deactivated checks are still visible in the library)
* **Delete** a check — permanently remove it (this cannot be undone; ensure no ongoing investigations depend on this check first)
* **View usage history** — see how many times the check has been run and by whom
Editing a published check creates a new **version** of it. Previous verification results are always linked to the check version that was active when they were run, so historical records remain accurate.
***
## Roles and permissions
| Role | What they can do |
| ---------------- | ----------------------------------------------------------- |
| **Admin** | Create, edit, publish, deactivate, and delete custom checks |
| **Manager** | Run custom checks and view results |
| **Investigator** | Run custom checks and view results |
| **Viewer** | View results only — cannot run checks |
***
## Next steps
Apply your verification results to an insurance claim workflow.
Use the standard or advanced business KYC flows alongside your custom checks.
Navigate to **Checks → Custom** in the left sidebar to open the Custom Checks workspace.
The screen is divided into two areas:
**Left panel — Available checks:**
A catalogue of all individual check components you can include in your custom flow. These include:
* Identity checks (national ID, passport, alien ID)
* Biometric checks (face match, liveness)
* Contact checks (phone OTP, email verification)
* Sanctions screening (select which watchlists to include)
* Document authenticity (choose document types)
* Asset verification (vehicle, property)
* Digital footprint (OSINT analysis)
* Financial checks (credit score, employment)
**Right panel — Your workflow builder:**
Drag check components from the left panel into the right panel to build your flow. Components are executed in the order they appear — from top to bottom. You can drag to reorder them.
***
## Creating a Custom Check
Click the **New Custom Check** button in the top-right corner of the screen. A dialog box appears asking you to name your check.
Give your check a descriptive name that your team will recognise — for example, "Broker Onboarding — Full", "High-Value Claimant Screen", or "Supplier Due Diligence". Click **Create**.
Drag the check types you want from the left panel into the workflow area on the right. Each component can be configured individually — click the **gear icon** on any component to open its settings, where you can specify:
* Which data source to use
* What the minimum score threshold should be for a "pass"
* Whether this component is required or optional
* What action to take on a failure (stop the flow, flag for review, continue anyway)
At the bottom of the workflow builder, configure the **Overall Decision Logic**:
* **All must pass** — the participant only receives a "Verified" outcome if every single component passes
* **Weighted scoring** — each component is assigned a weight; the participant passes if the weighted total score exceeds your threshold
* **Custom logic** — define your own pass/fail rules using the rule editor (requires the Advanced plan)
Click **Save** to save your configuration as a draft. Click **Publish** to make the check available to the rest of your team. Once published, the check appears in the Custom Checks dropdown when your team members run a verification.
***
## Running a Custom Check
Once a Custom Check has been published, any team member with the **Investigator** or **Admin** role can run it:
Go to **Checks → Custom** and use the **Search Participant** field to find the person or business you want to verify. You can search by name, email, ID number, or participant ID.
From the **Check Type** dropdown, select the custom check you want to run. The dropdown shows all published checks your organisation has created.
If the participant has been verified before, any previously collected data (name, ID number, date of birth, etc.) is pre-filled automatically. Review it for accuracy before proceeding.
Click **Run Check**. The platform executes each component of your custom flow in sequence. A progress bar shows which component is currently running. The full check typically completes in under 2 minutes depending on the number of components.
Once complete, the result screen shows each component's individual outcome alongside the overall decision. You can expand any component to see the raw data returned by the data provider.
***
## Managing Custom Checks
Your organisation's Custom Checks are managed from the **Custom Checks library** accessible through **Workspace → Custom Checks** (Admin role required).
From the library you can:
* **Edit** an existing check — update components, thresholds, or decision rules
* **Duplicate** a check — create a new check based on an existing one as a starting point
* **Deactivate** a check — hide it from the run dropdown without deleting it (deactivated checks are still visible in the library)
* **Delete** a check — permanently remove it (this cannot be undone; ensure no ongoing investigations depend on this check first)
* **View usage history** — see how many times the check has been run and by whom
Editing a published check creates a new **version** of it. Previous verification results are always linked to the check version that was active when they were run, so historical records remain accurate.
***
## Roles and permissions
| Role | What they can do |
| ---------------- | ----------------------------------------------------------- |
| **Admin** | Create, edit, publish, deactivate, and delete custom checks |
| **Manager** | Run custom checks and view results |
| **Investigator** | Run custom checks and view results |
| **Viewer** | View results only — cannot run checks |
***
## Next steps
Apply your verification results to an insurance claim workflow.
Use the standard or advanced business KYC flows alongside your custom checks.