

Overview
Individual KYC (Know Your Customer) is the process of confirming that a person is who they claim to be. Verify Group supports two levels of individual identity verification:- Standard KYC — A focused identity check using national ID or passport number. Suitable for basic onboarding and compliance requirements.
- Advanced KYC — A comprehensive multi-step check that also verifies biometrics, contact details, sanctions screening, financial footprint, and digital presence. Suitable for high-risk onboarding, insurance claims, and regulatory compliance.
Watch the Individual KYC Walkthrough
A step-by-step video demonstration of the Standard and Advanced Individual KYC flows from start to result.
Before you begin
To run an individual KYC check, you need:- The participant’s full legal name (as it appears on their government-issued ID)
- Their national ID number, passport number, or alien ID number
- Their country of residence (for routing the verification to the correct data provider)
- Phone number (for contact verification)
- Date of birth
- Email address
Starting a verification
1
Navigate to Checks in the sidebar
In the left sidebar, click Checks. This opens the Verification hub where you can start new checks or review past ones.
2
Select Individual Verification
Under Individual, choose either Standard or Advanced depending on the depth of check you need. If you are unsure, start with Standard — you can always escalate to Advanced later.
Standard KYC — Identity check
The Standard flow asks for the minimum information needed to verify someone’s identity against government records.Step 1 — Enter the participant’s details
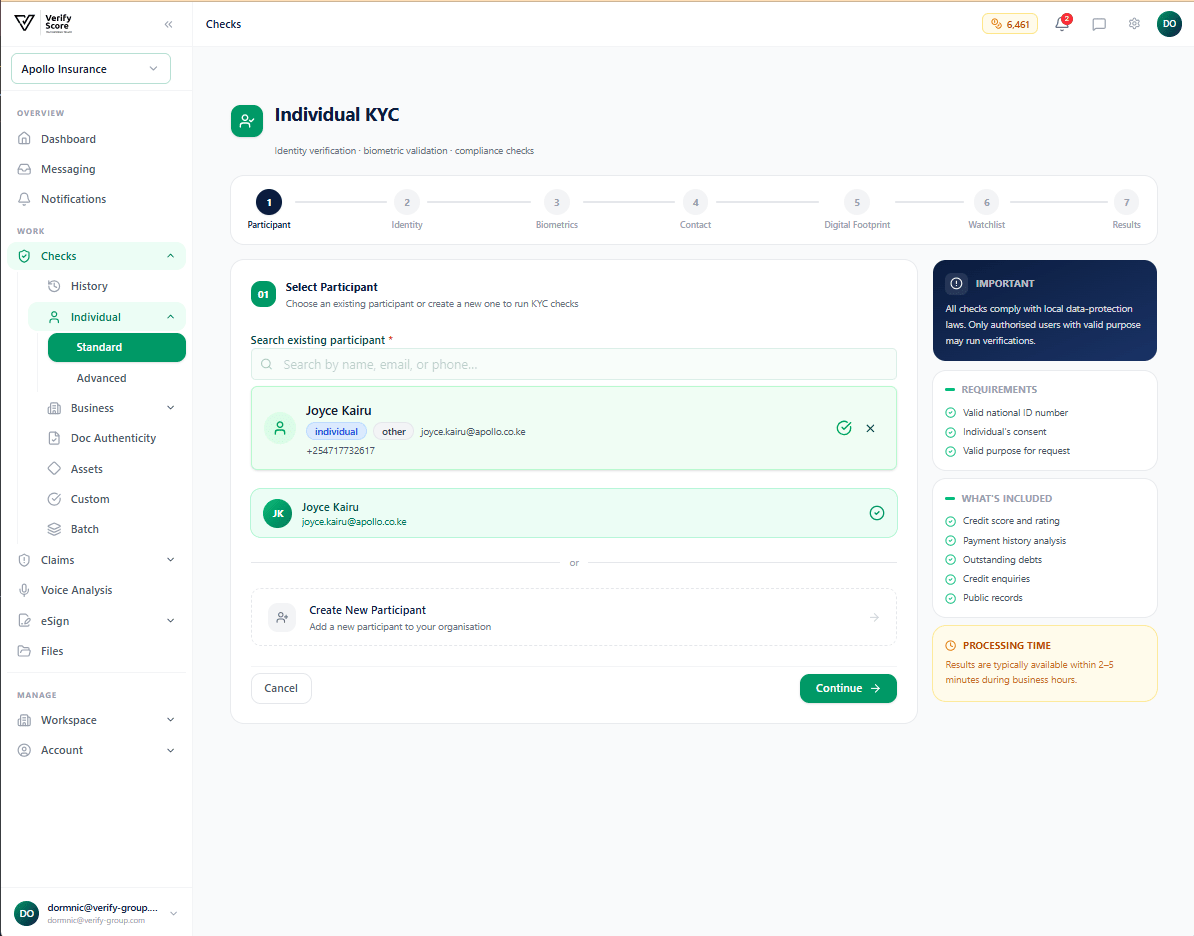
- Identifier type — select the type of ID you have (National ID, Passport, Alien ID, KRA PIN)
- Identifier number — type the exact number from the physical document
- Country — select the country that issued the document
Step 2 — Review the identity result
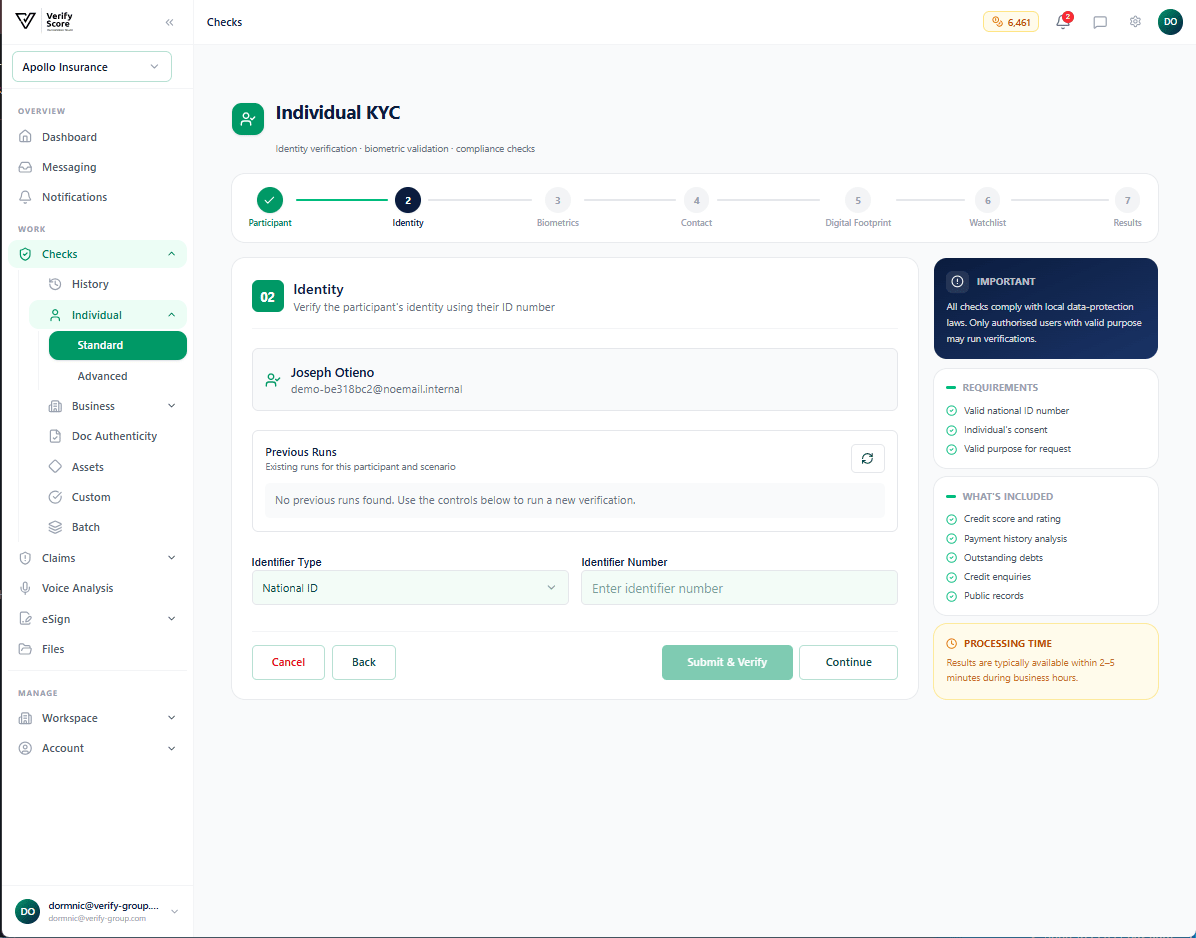
A green badge marked “Verified” means the identity was confirmed. A red badge means the data did not match — check the ID number and resubmit, or escalate to Advanced KYC for a more thorough investigation.
Step 3 — View the full result
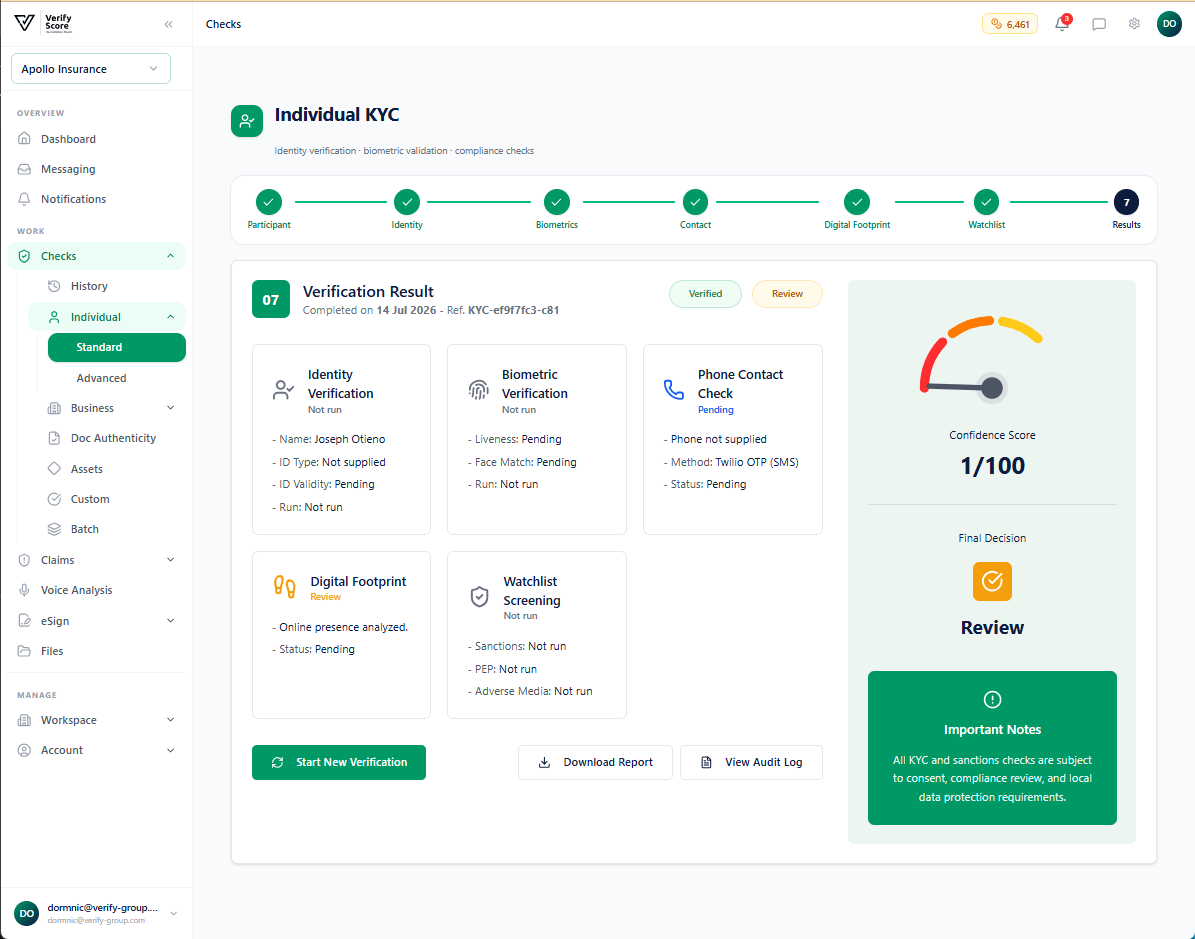
- Download the report as a PDF for your records
- Sync the result to the participant’s profile (updates their KYC status automatically)
- Escalate to Advanced KYC if the Standard check was inconclusive
Advanced KYC — Multi-step comprehensive check
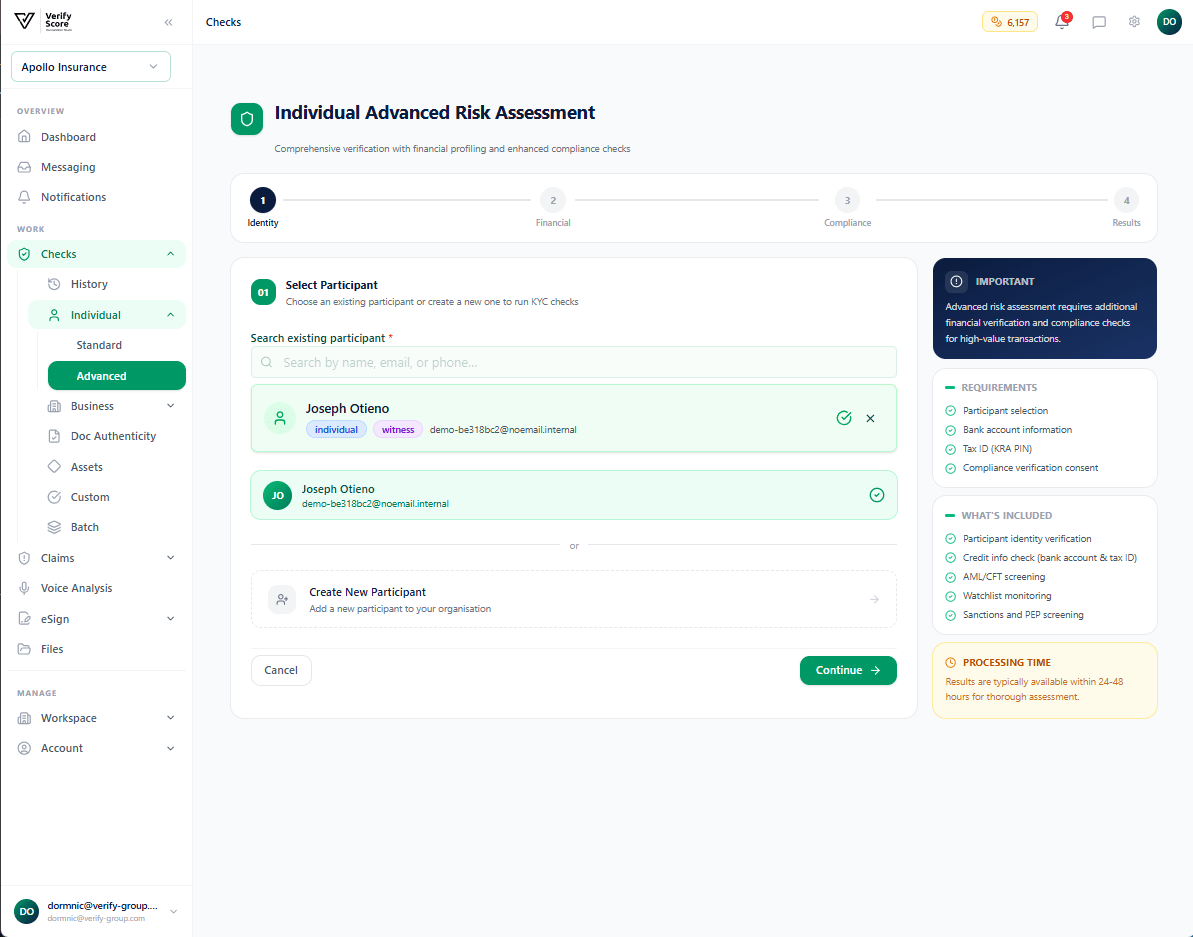
The Advanced flow adds several additional verification layers on top of the Standard identity check. Each step can be completed independently, and you can return to complete remaining steps later if needed.Step 1 — Start the Advanced check
Step 2 — Biometrics verification
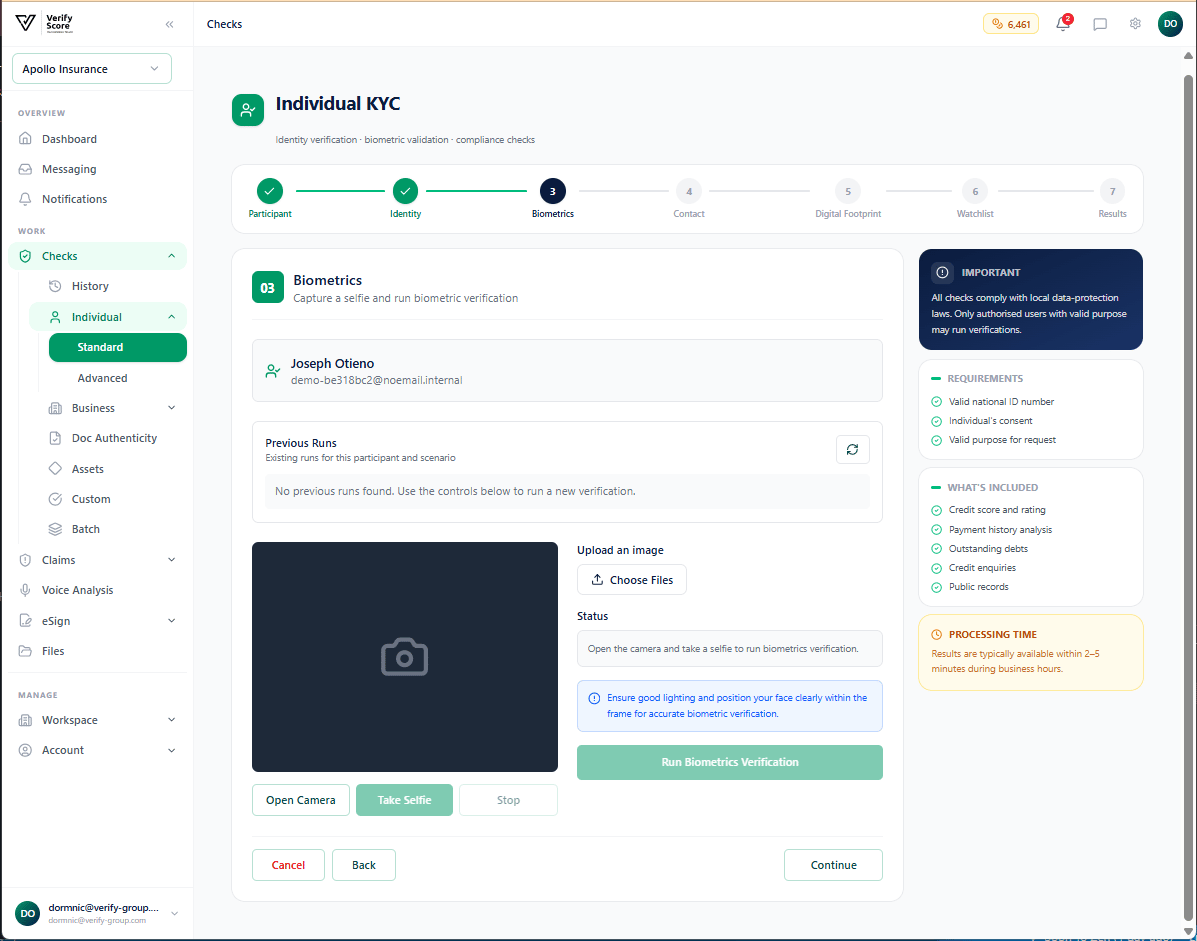
- The participant is prompted to take a selfie or upload a recent photo
- The system compares this image against the registered photo using facial recognition
- A liveness score is calculated to confirm the image is of a real, present person (not a printed photo or screen recording)
For remote verifications, the participant can complete the biometrics step through a secure link sent to their phone. They are not required to be present at your office.
Step 3 — Contact verification
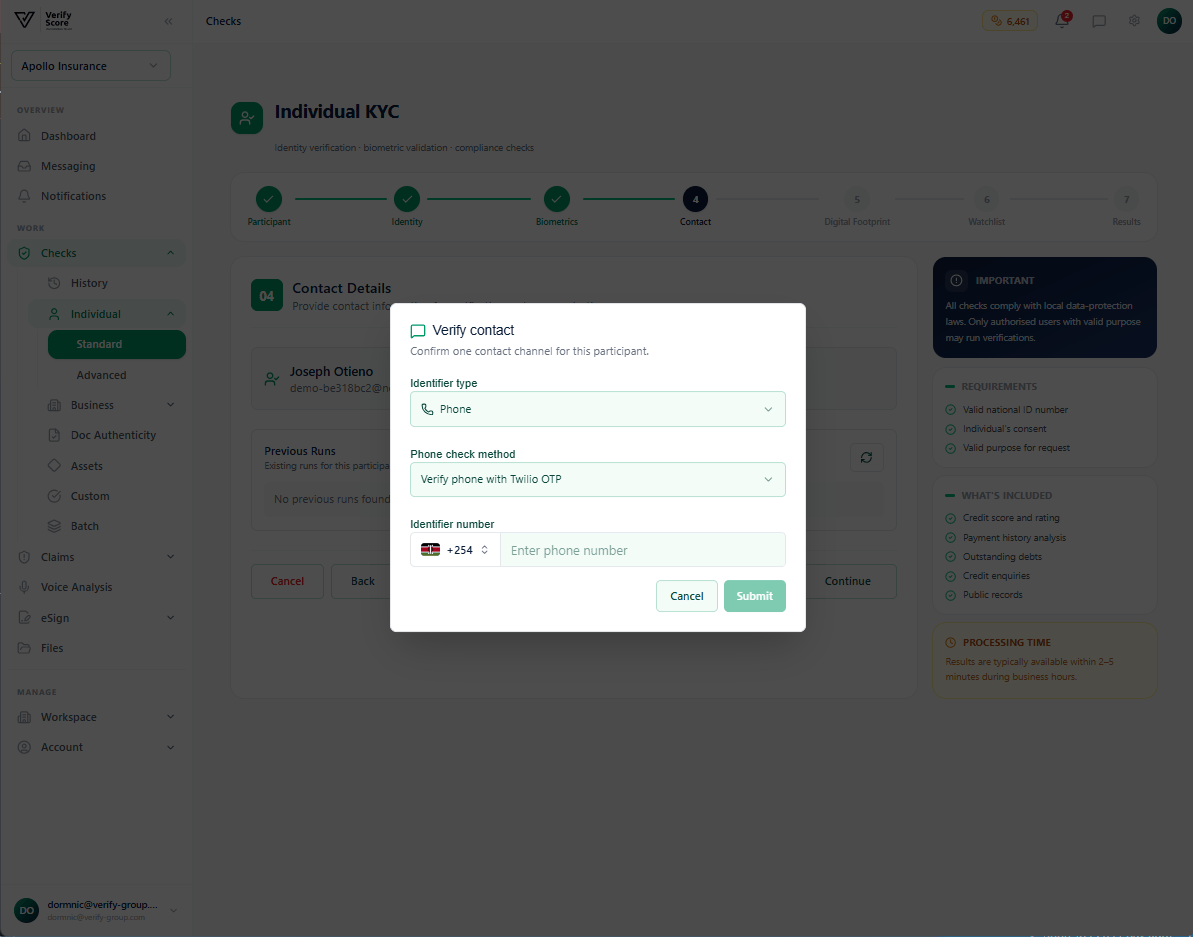
- Phone verification — a one-time code is sent to the mobile number; the participant must enter the code to confirm ownership
- Email verification — a confirmation link is sent to the email address
Step 4 — Sanctions screening
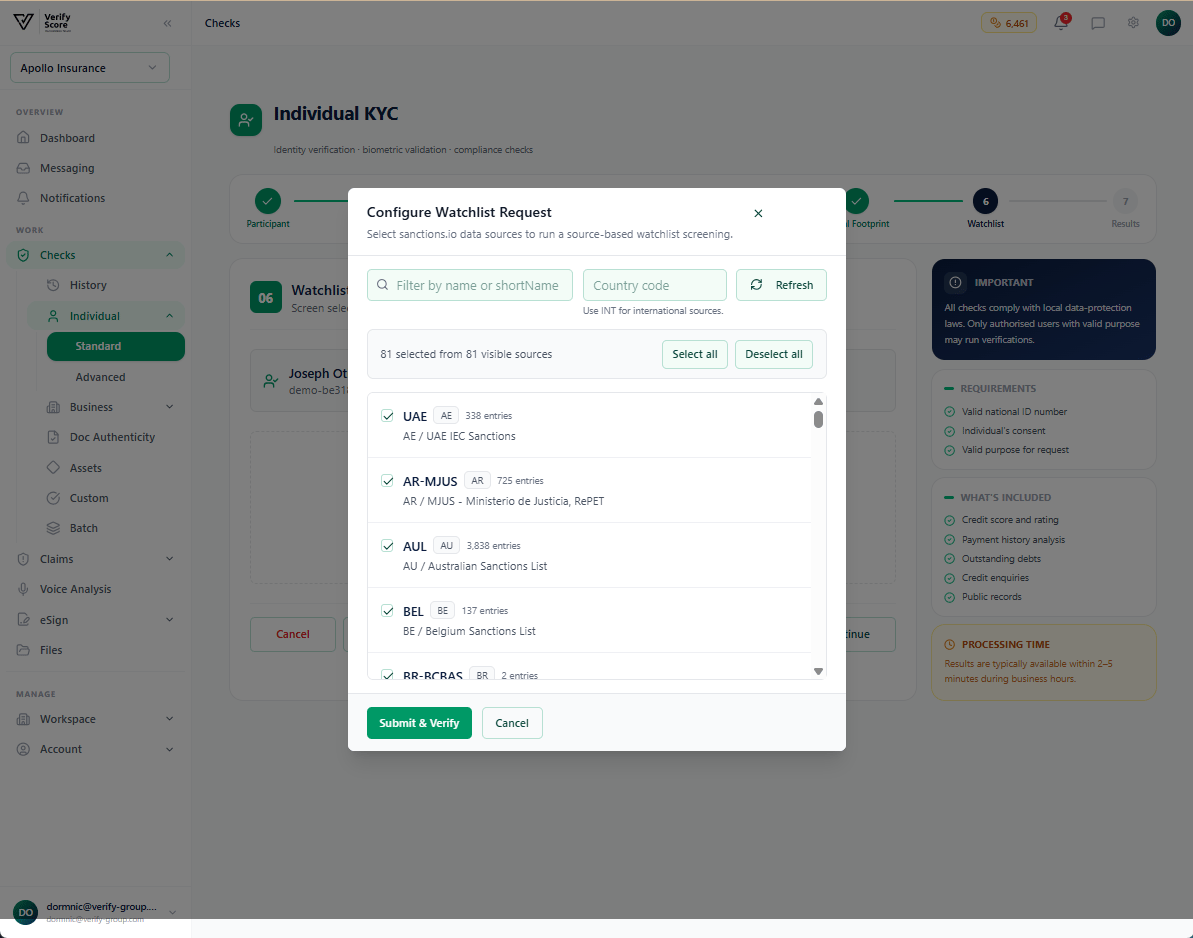
- OFAC SDN List (US Treasury)
- UN Security Council Consolidated List
- EU Sanctions List
- UK HM Treasury Financial Sanctions
- Interpol Notices
- Regional African watchlists
Step 5 — Digital footprint
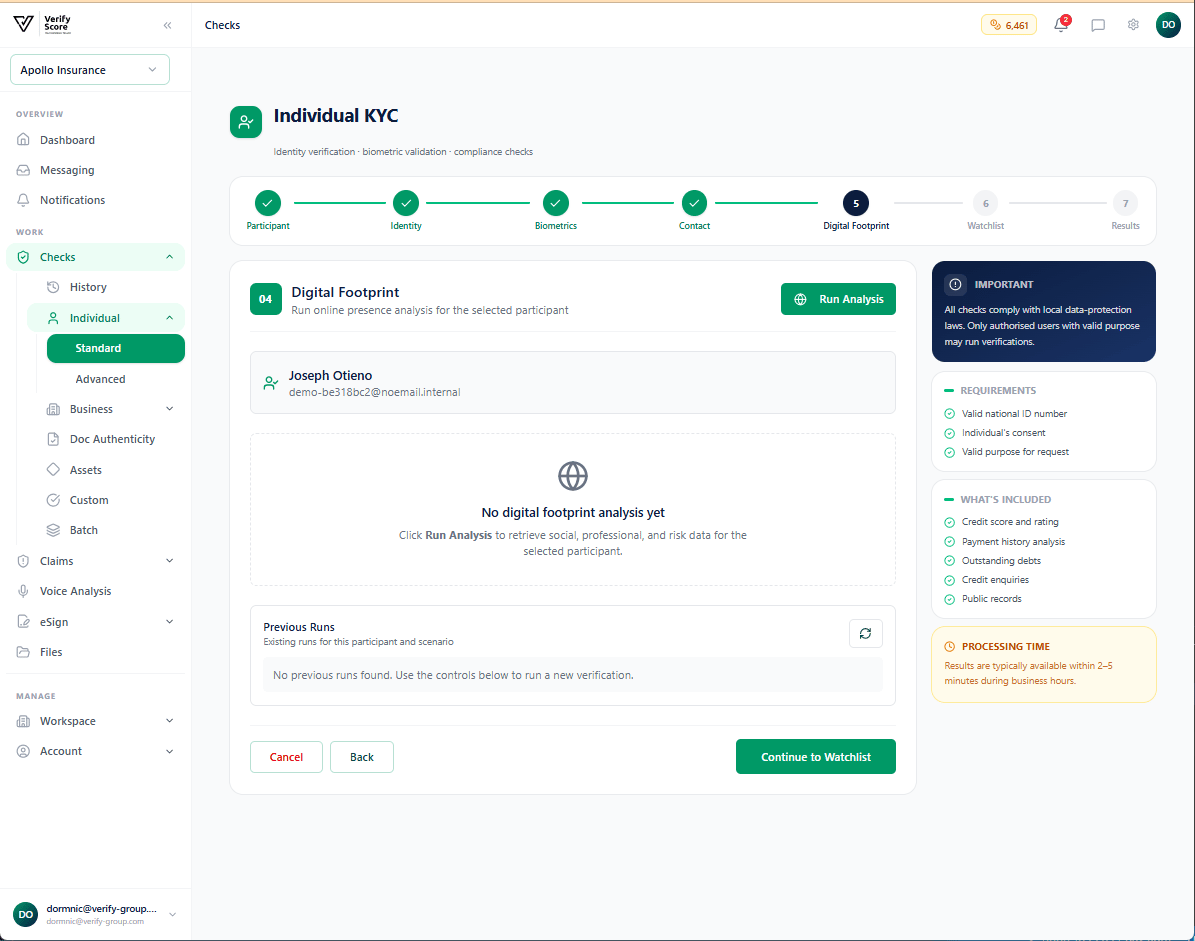
- Social media profiles — whether the participant has verifiable social media accounts consistent with their claimed identity
- Professional listings — company directories, LinkedIn, and professional registries
- Email domain reputation — whether the email address is from a reputable provider or a disposable address
- Phone number intelligence — carrier, country of registration, and whether the number has been flagged for fraud
Step 6 — Financial verification
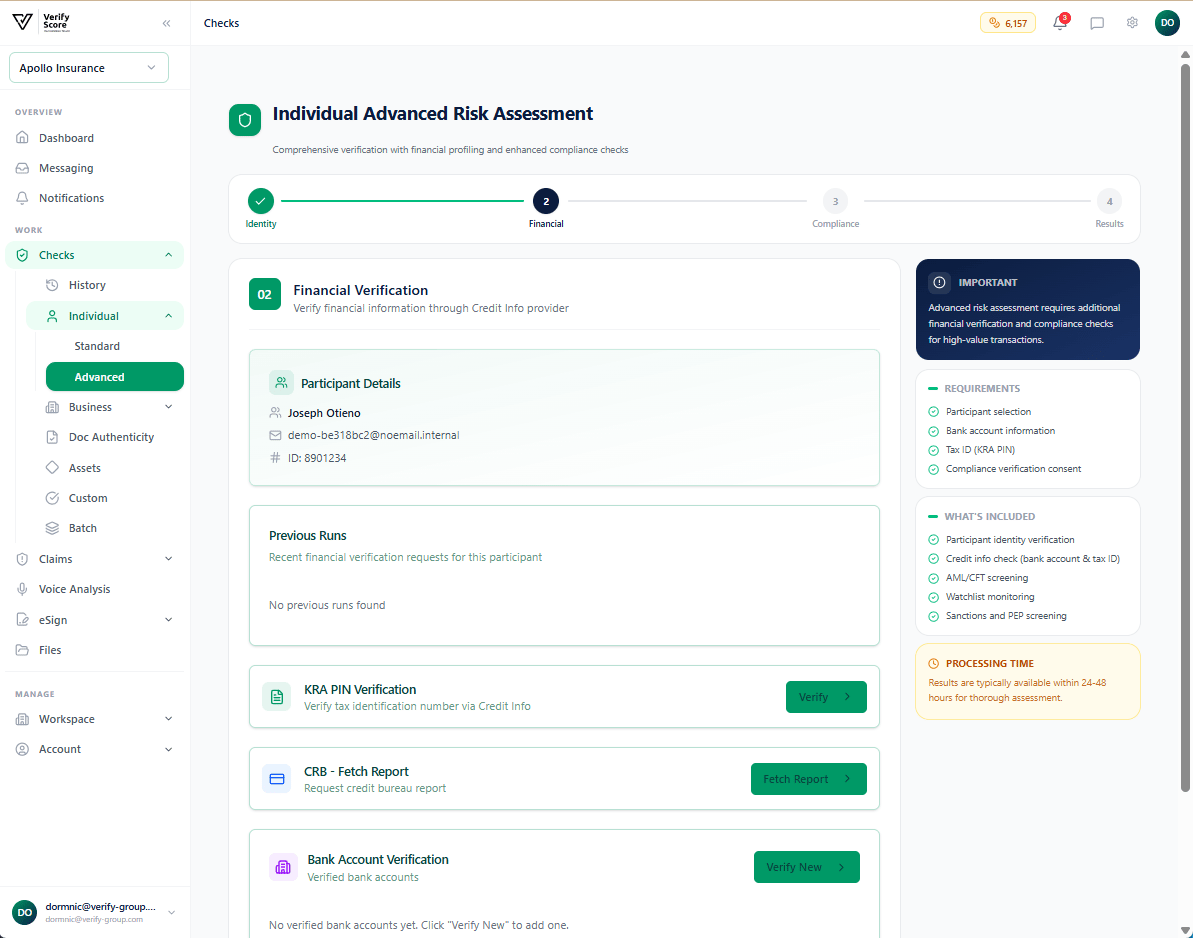
- Credit score and rating band
- Employment status as reported by formal payroll and tax records
- Outstanding obligations — active loans, debt facilities, or defaults
- Adverse information flags — county court judgements, bankruptcies, or regulatory sanctions
Step 7 — Review the Advanced results
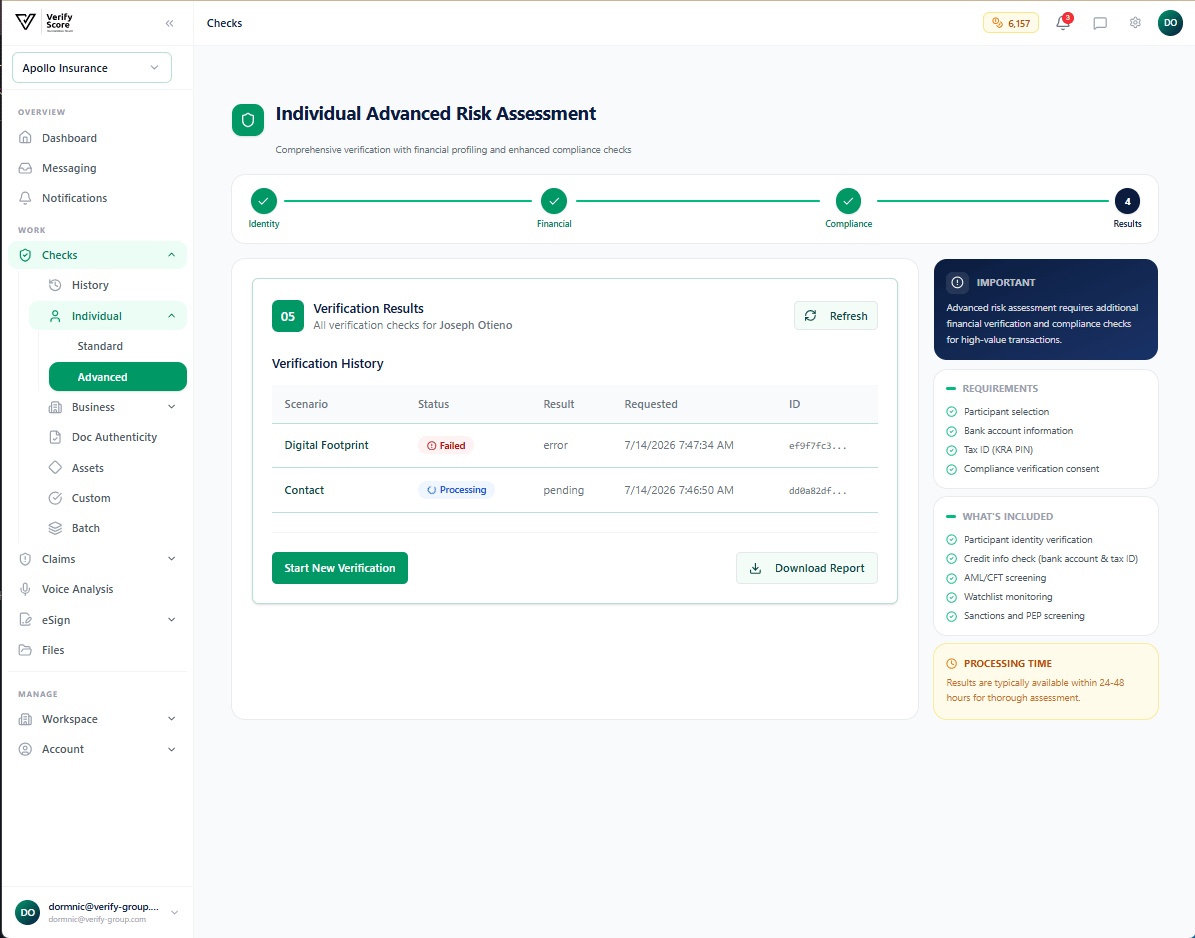
Use this summary to make an informed decision about whether to proceed with onboarding the participant, require further documentation, or decline.
Reviewing past verifications
KYC History
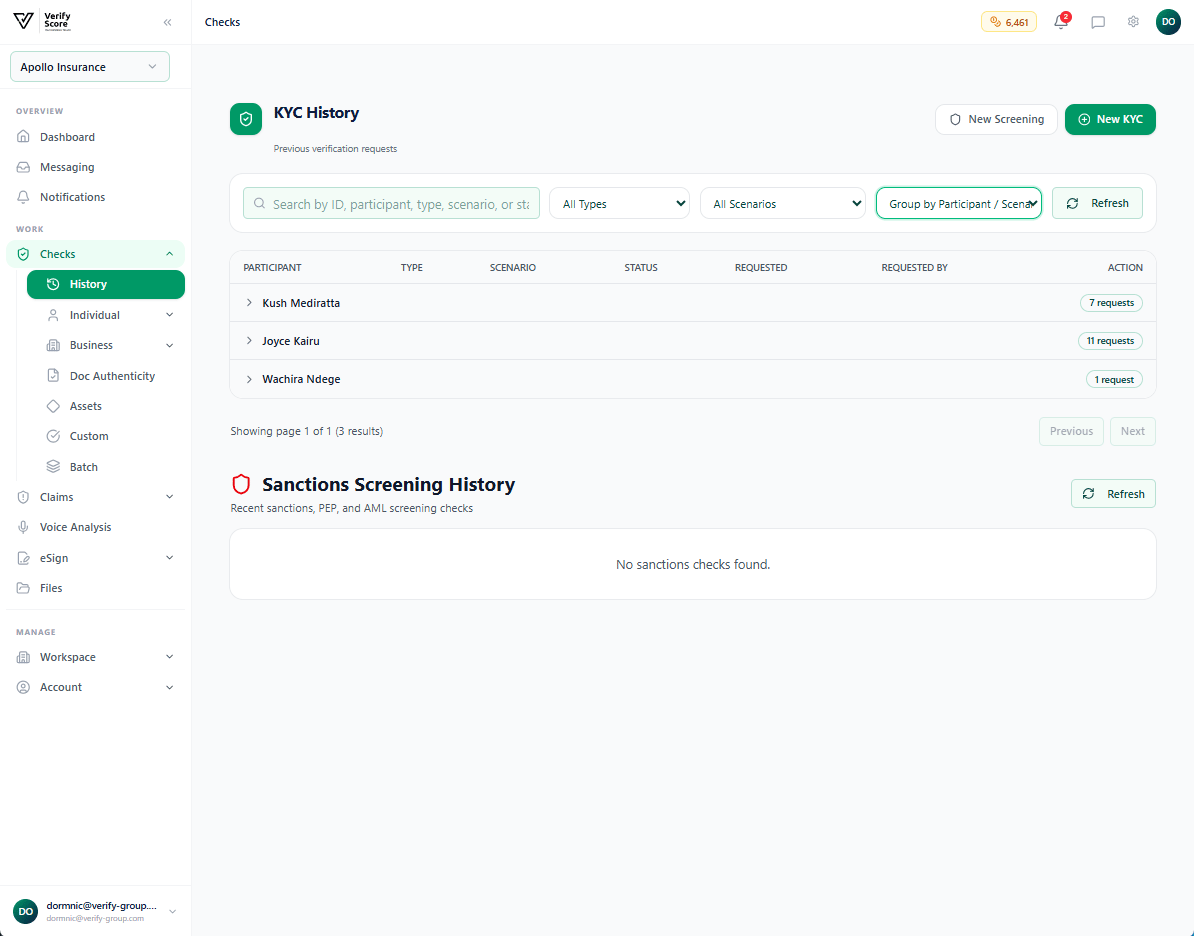
- Participant name or ID number
- Verification type (Standard, Advanced, Business, Document, etc.)
- Status (Pending, Completed, Failed, In Review)
- Date range
- Assigned user (the team member who ran the check)
Understanding verification statuses
Next steps
Business Verification
Run KYC/KYB on companies and business entities.
Document Verification
Verify the authenticity of physical documents.